Update: October 15, 2018
Some quick notes for running mallory once the configuration steps below have been performed:
- Ensure the VM has two physical Internet connections from the host
- VM should be set to Bridged
- Run this wifi-ap creation script
- Shovel all traffic to mallory using this command
- Ensure the mallory CA in (/mallory/current/src/ca) is installed on the target device
- Start mallory (mallory/current/src/mallory.py)
- Start GUI (mallory/current/src/launchgui.py)
Update: July 10, 2017
I recently had to set up an environment like the one below for another app review. There are several updates to the way I performed this MitM since this article was originally written. One of the significant advantages to this new method is there is only one (Kali) VM required instead of two, which greatly simplifies the networking component of this.
2017 Test Setup
- MacOS running Parallels 12 (late 2016 mac with a dongle used for USB - I originally thought this was an issue preventing me from success, but it turns out it isn’t Note: I had to unplug/re-plug the TL-WN722N into the dongle if Kali didn’t register it. This happened fairly frequently, and required that I reboot my VM and re-start the process before I could successfully proxy)
- TP-Link TL-WN722N adapter (the same used in Dec 2015)
- Kali 2017.1 XFCE
- Kali VM set to Bridged networking, so assigned a 192.168 address on my LAN. The WiFi AP will assign hosts to the 10.0.0.1/24 space
Install Mallory and Dependencies
With Kali installed and patched in a vm, I followed the same instructions as below for installing Mallory:
$ apt install -y python-pip python-m2crypto python-qt4 pyro-gui python-netfilter python-pyasn1 python-paramiko python-twisted-web python-qt4-sql sqlite3 build-essential libnetfilter-conntrack-dev libnetfilter-conntrack3
$ git clone https://github.com/intrepidusgroup/mallory.git
$ cd mallory
$ ./mallory_install.sh
Configure Wireless Access Point
-
Set the Kali VM to Bridged Networking
-
Connect TL-WN722N adapter to Mac and assign it to the Kali VM
-
Bring up the wlan0 interface
$ ifconfig wlan0 up 10.0.0.1 netmask 255.255.255.0 -
Install hostapd and dnsmasq
$ apt install -y hostapd dnsmasq -
Set up /root/Desktop/hostapd.conf
interface=wlan0
driver=nl80211
ssid=Wifi AP Name
hw_mode=g
channel=11
wpa=2
wpa_passphrase=Wifi AP Passphrase
- Uncomment lines from /etc/dnsmasq.conf (create a file /etc/dnsmasq.conf if one isn’t present and add the following:)
interface=lo,wlan0
no-dhcp-interface=lo
dhcp-range=10.0.0.2,10.0.0.20,12h
-
Start dnsmasq service as a daemon
$ dnsmasq -C /etc/dnsmasq.conf -d & -
Set appropriate iptables rules and enable ip forwarding by the kernel to allow the AP to function in monitor mode
$ iptables --flush
$ iptables --table nat --flush
$ iptables --delete-chain
$ iptables --table nat --delete-chain
$ iptables --table nat --append POSTROUTING --out-interface eth0 -j  MASQUERADE
$ iptables --append FORWARD --in-interface wlan0 -j ACCEPT
$ sysctl -w net.ipv4.ip_forward=1
- Disable Wireless and check that the TL-WN722N isn’t blocked by the kernel
$ nmcli radio wifi off
$ rfkill list
(if the TL-WN722N is blocked by the kernel)
$ rfkill unblock wifi
-
Start hostapd
$ hostapd -B /root/Desktop/hostapd.conf -
Bring up the TL-WN722N interface
$ ifconfig wlan0 up
$ ifconfig wlan0 10.0.0.1/24
-
Your Access point should be running with Internet connectivity. To shovel traffic to Mallory (here MQTT), set another iptables rule:
$ iptables -t nat -A PREROUTING -p tcp --dport 8883 -j REDIRECT --to-ports 20755 -
Add the protocol in Mallory’s GUI, by selecting the Protocols tab, entering the protocol in the Protocol Configuration input, and selecting Apply:
#ssh_2: ssh.SSHProtocol: 22
mqtt_traffic: sslproto.SSLProtocol:8883
- In the Rules tab, create a rule following the instructions outlined below.
- In the Streams tab, select Intercept to trap traffic you want to tamper with.
Original Method
No, I’m not trying to re-invent the MitM initialism. However, I do want to detail setting up the Mallory intercepting proxy for use in mobile application assessments. Mallory is a useful tool for intercepting non-HTTP traffic. On a recent engagement, I had a need to proxy IMAP/S traffic to determine how the mobile application I was testing handled messaging. Alas, trusty Burp suite couldn’t help me here, so I turned to Mallory, as Mallory can intercept and tamper with non-HTTP protocol traffic.
Old Method
Test Environment Setup
My testing setup looked like this:
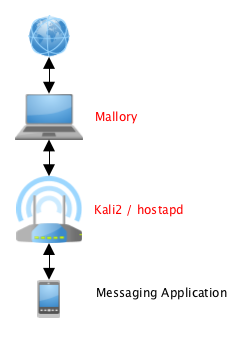
Mallory setup to MitM IMAP/S traffic
I was using a TP-LINK TL-WN722N connected to my kali 2 vm running hostapd to simulate the wireless access point.
I initially created an Ubuntu 11.04 VM to use as a base for Mallory, but this didn’t work so I used 14.04 as a base. This fixed an error that I could never determine the root cause of.
I’d like to walk you through the same configuration steps I took to successfully exploit the messaging application by revealing its IMAP/S communications.
Mallory installation
Install Mallory from the instructions provided at
https://bitbucket.org/IntrepidusGroup/mallory/wiki/Installation.
However, use an Ubuntu 14.04 VM instead of Ubuntu 11.04 or you may encounter…
issues. There will be broken dependencies; these can be resolved by observing
the python error raised when you run python mallory.py Use either
easy_install or pip to install the missing module raised.
VMWare Custom Network
Configure a custom network (vmnet) using the virtual network editor (VMWare Workstation) or the Network editor in VMWare Preferences -> Network (VMWare Fusion). This will be referred to as the “custom vmnet” and you can see in the screenshot below that I’ve named mine “vmnet4”. Choose an RFC 1918 address, appropriate subnet mask, and enable DHCP on this interface. This interface should be host-only.
Below is a screenshot showing my configuration on VMWare Fusion:
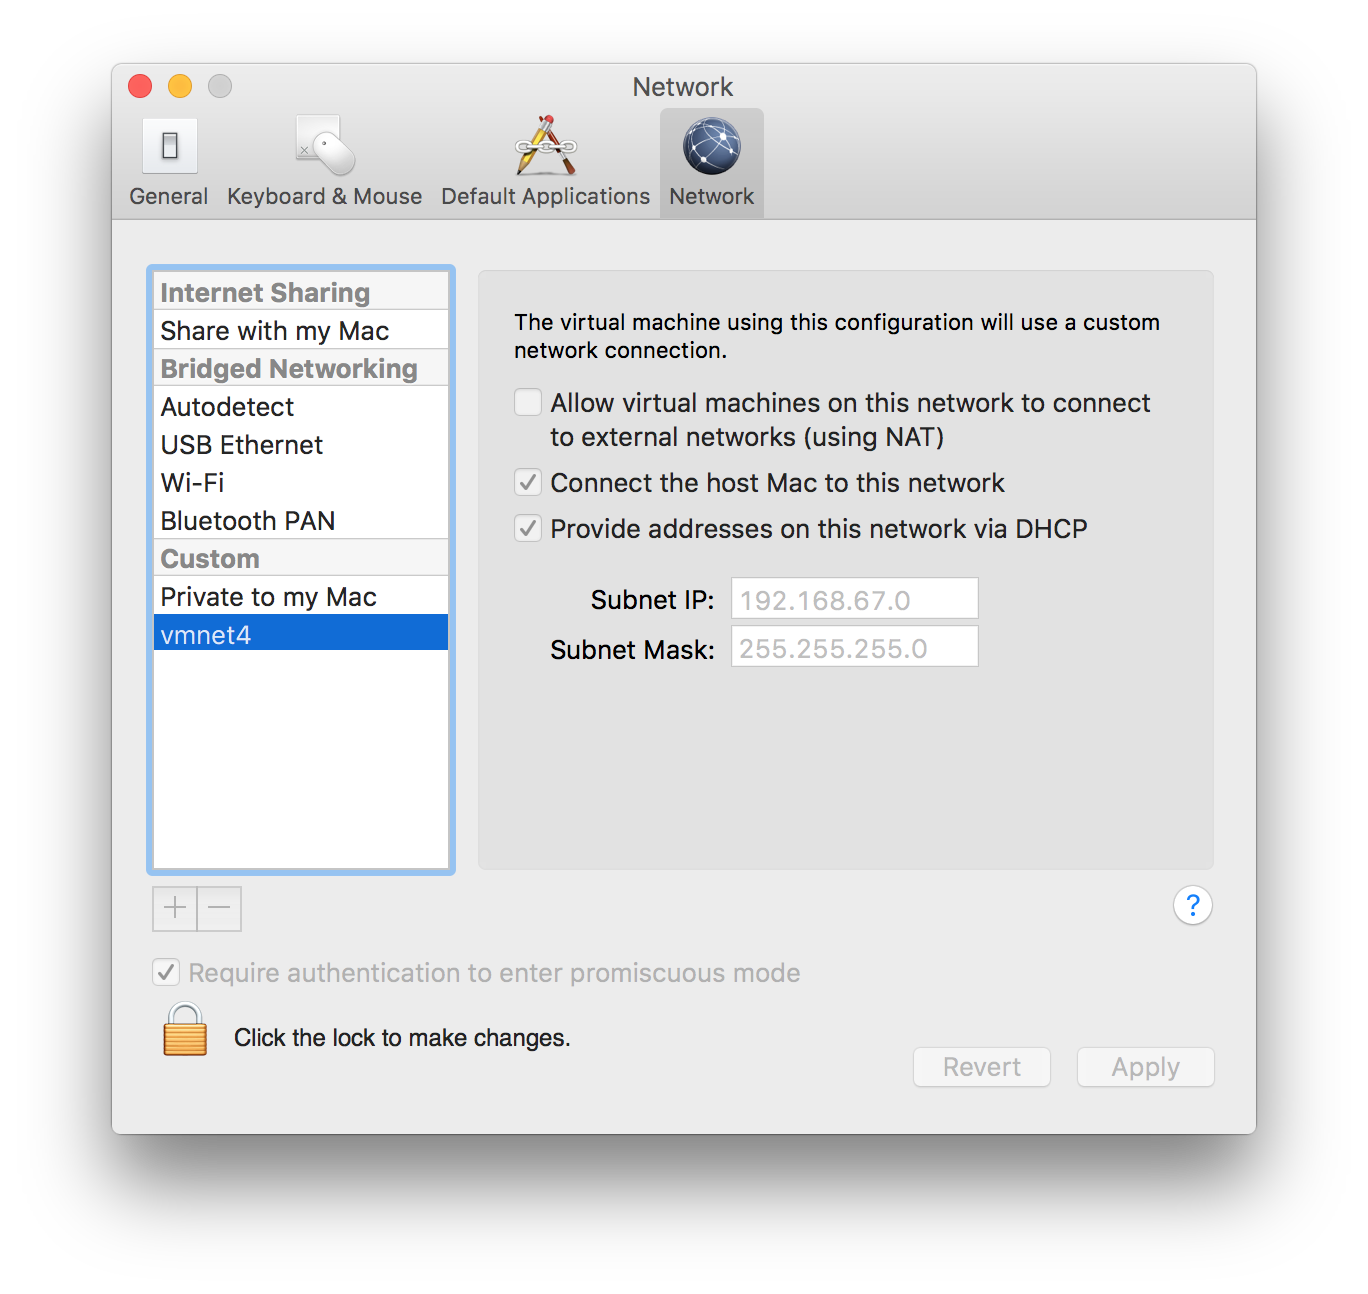
VMWare Fusion Network Editor
Mallory VM
Configure the Mallory VM to have two interfaces: one bridged interface that can reach the Internet, and one interface mapped to custom vmnet. Here’s my mallory vm ifconfig output (eth0 is the bridged interface, eth1 is the custom vmnet interface):

Mallory VM ifconfig output
The Mallory VM should now be able to resolve IP addresses and DNS names on the eth0 interface.
Kali / Rogue AP VM
From your attacking VM, set the network interface to use the custom vmnet. In my case, this was vmnet4 as shown here:
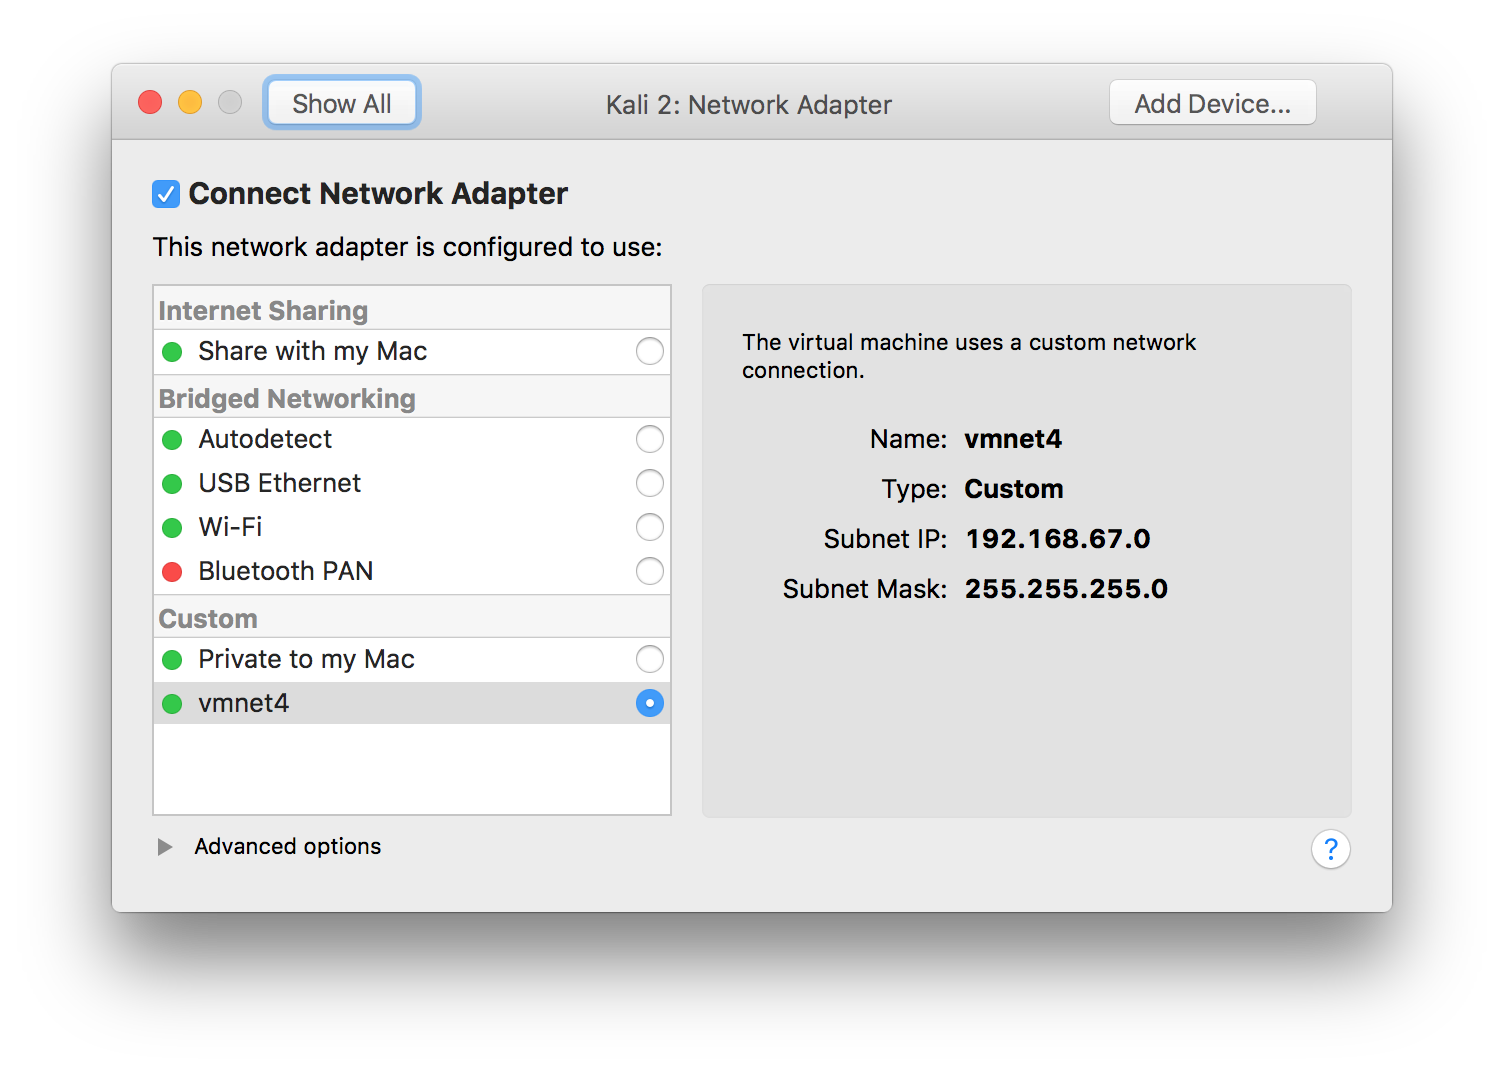
Kali/Rogue AP VM network configuration in VMWare Fusion
In network-manager (Kali 1.X, 2.X and above), select your wired connection in network manager and then select “Add Profile…” Fill in the information as requested, similar to:
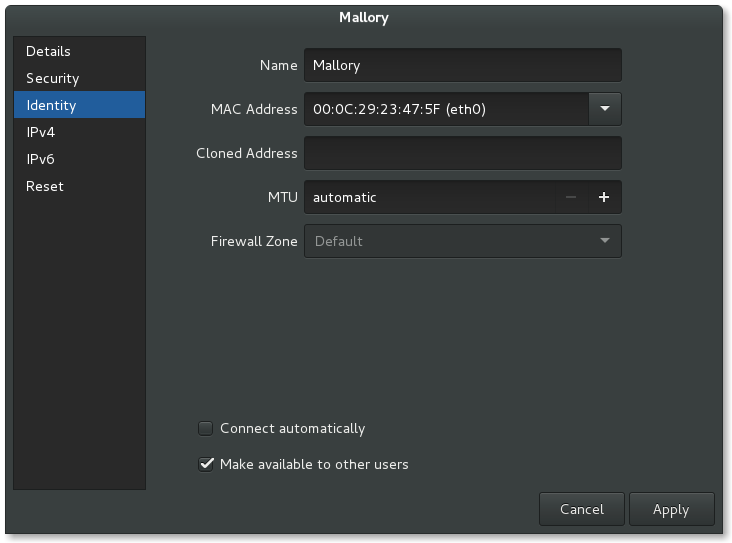
New network-manager profile for custom vmnet
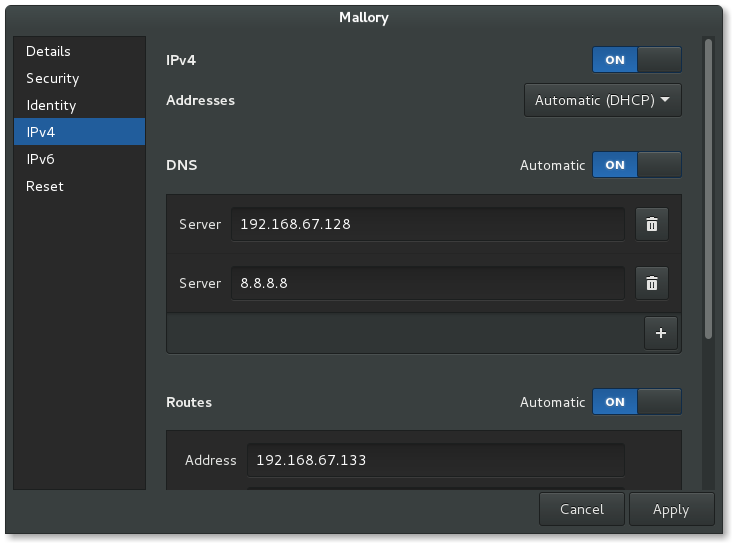
Wired connection to Mallory VM settings (1/2)
Note, you should set the Mallory IP address as another DNS server here as well to shorten request times - name resolution will end up taking quite longer than usual.
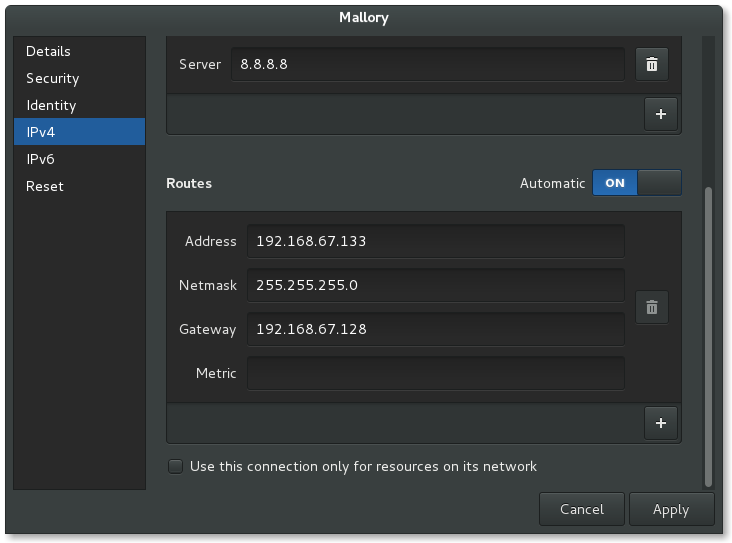
Wired connection to Mallory VM settings (2/2)
Note: The routing address here should be set to 192.168.67.0
Apply changes and select this wired connection. Now, traffic from your Kali VM will be routable through the Mallory VM once Mallory is configured.
SUMMARY OF NETWORK INTERFACE CONFIGURATION IN KALI / ROGUE AP VM:
My “vmnet4” custom network was configured to use the 192.168.67.0/24 range. My Mallory VM IP address is 192.168.67.128. Here are the network-manager changes I made:
Name: Mallory
MAC Address: eth0
IPv4: On
Addresses: Automatic (DHCP)
DNS: 192.168.67.128, 8.8.8.8
Routes Automatic: On
Address: 192.168.67.0
Netmask: 255.255.255.0
Gateway: 192.168.67.128
Launching Mallory
This section assumes Mallory was installed as root to /root/mallory/ Open two terminals: A and B. A will be used to launch mallory.py which can be thought of as the Mallory “service.” B will be used to launch Mallory’s QT GUI. Note: do not background these processes, open two separate terminals or tabs to run each command.
From Terminal A (Mallory service):
$ sudo su -
# cd /root/mallory/current/src
# python mallory.py
From Terminal B (Mallory GUI):
$ sudo su -
# cd /root/mallory/current/src
# python launchgui.py
The Mallory GUI should now be running.
Mallory - Interfaces Tab
Your outbound interface is your Mallory VM’s bridged interface (typically eth0). Your MITM interface is the custom VMWare interface you created in the VM configuration phase (typically eth1).
Mallory - Protocols Tab
The protocols Mallory will intercept can be defined in /root/mallory/current/src/protos.ini, and they can be defined in the textarea in the Protocols Tab. In the following example, Mallory is configured to intercept HTTP, HTTPS, and IMAP/S traffic. SSH traffic interception is commented out
 [protocols]
http_traffic: http.HTTP:80
https_traffic: https.HTTPS:443
imaps_traffic: sslproto.SSLProtocol:993
;ssh_traffic: sslproto.SSLProtocol:22
To add another SSL/TLS-wrapped non-HTTP protocol, for example LDAP/S, add another line as such:
ldaps_traffic: sslproto.SSLProtocol:636
For issues related to “Debuggable: No” appearing in this screen see https://groups.google.com/forum/#!topic/mallory-proxy/PF2MwXOpcEg
Note that the protocols I was able to successfully MITM did not show up as “Debuggable: Yes” or “Debuggable: No” in this tab.
Mallory -Rules Tab
Create a rule for the host you want to intercept traffic to/from and name it appropriately. These settings for IMAP/S traffic worked for me:
Traffic direction: Both
Port: *
Type: Debug
Payload: *
Passthru: No
Here's my IMAP/S rules tab:
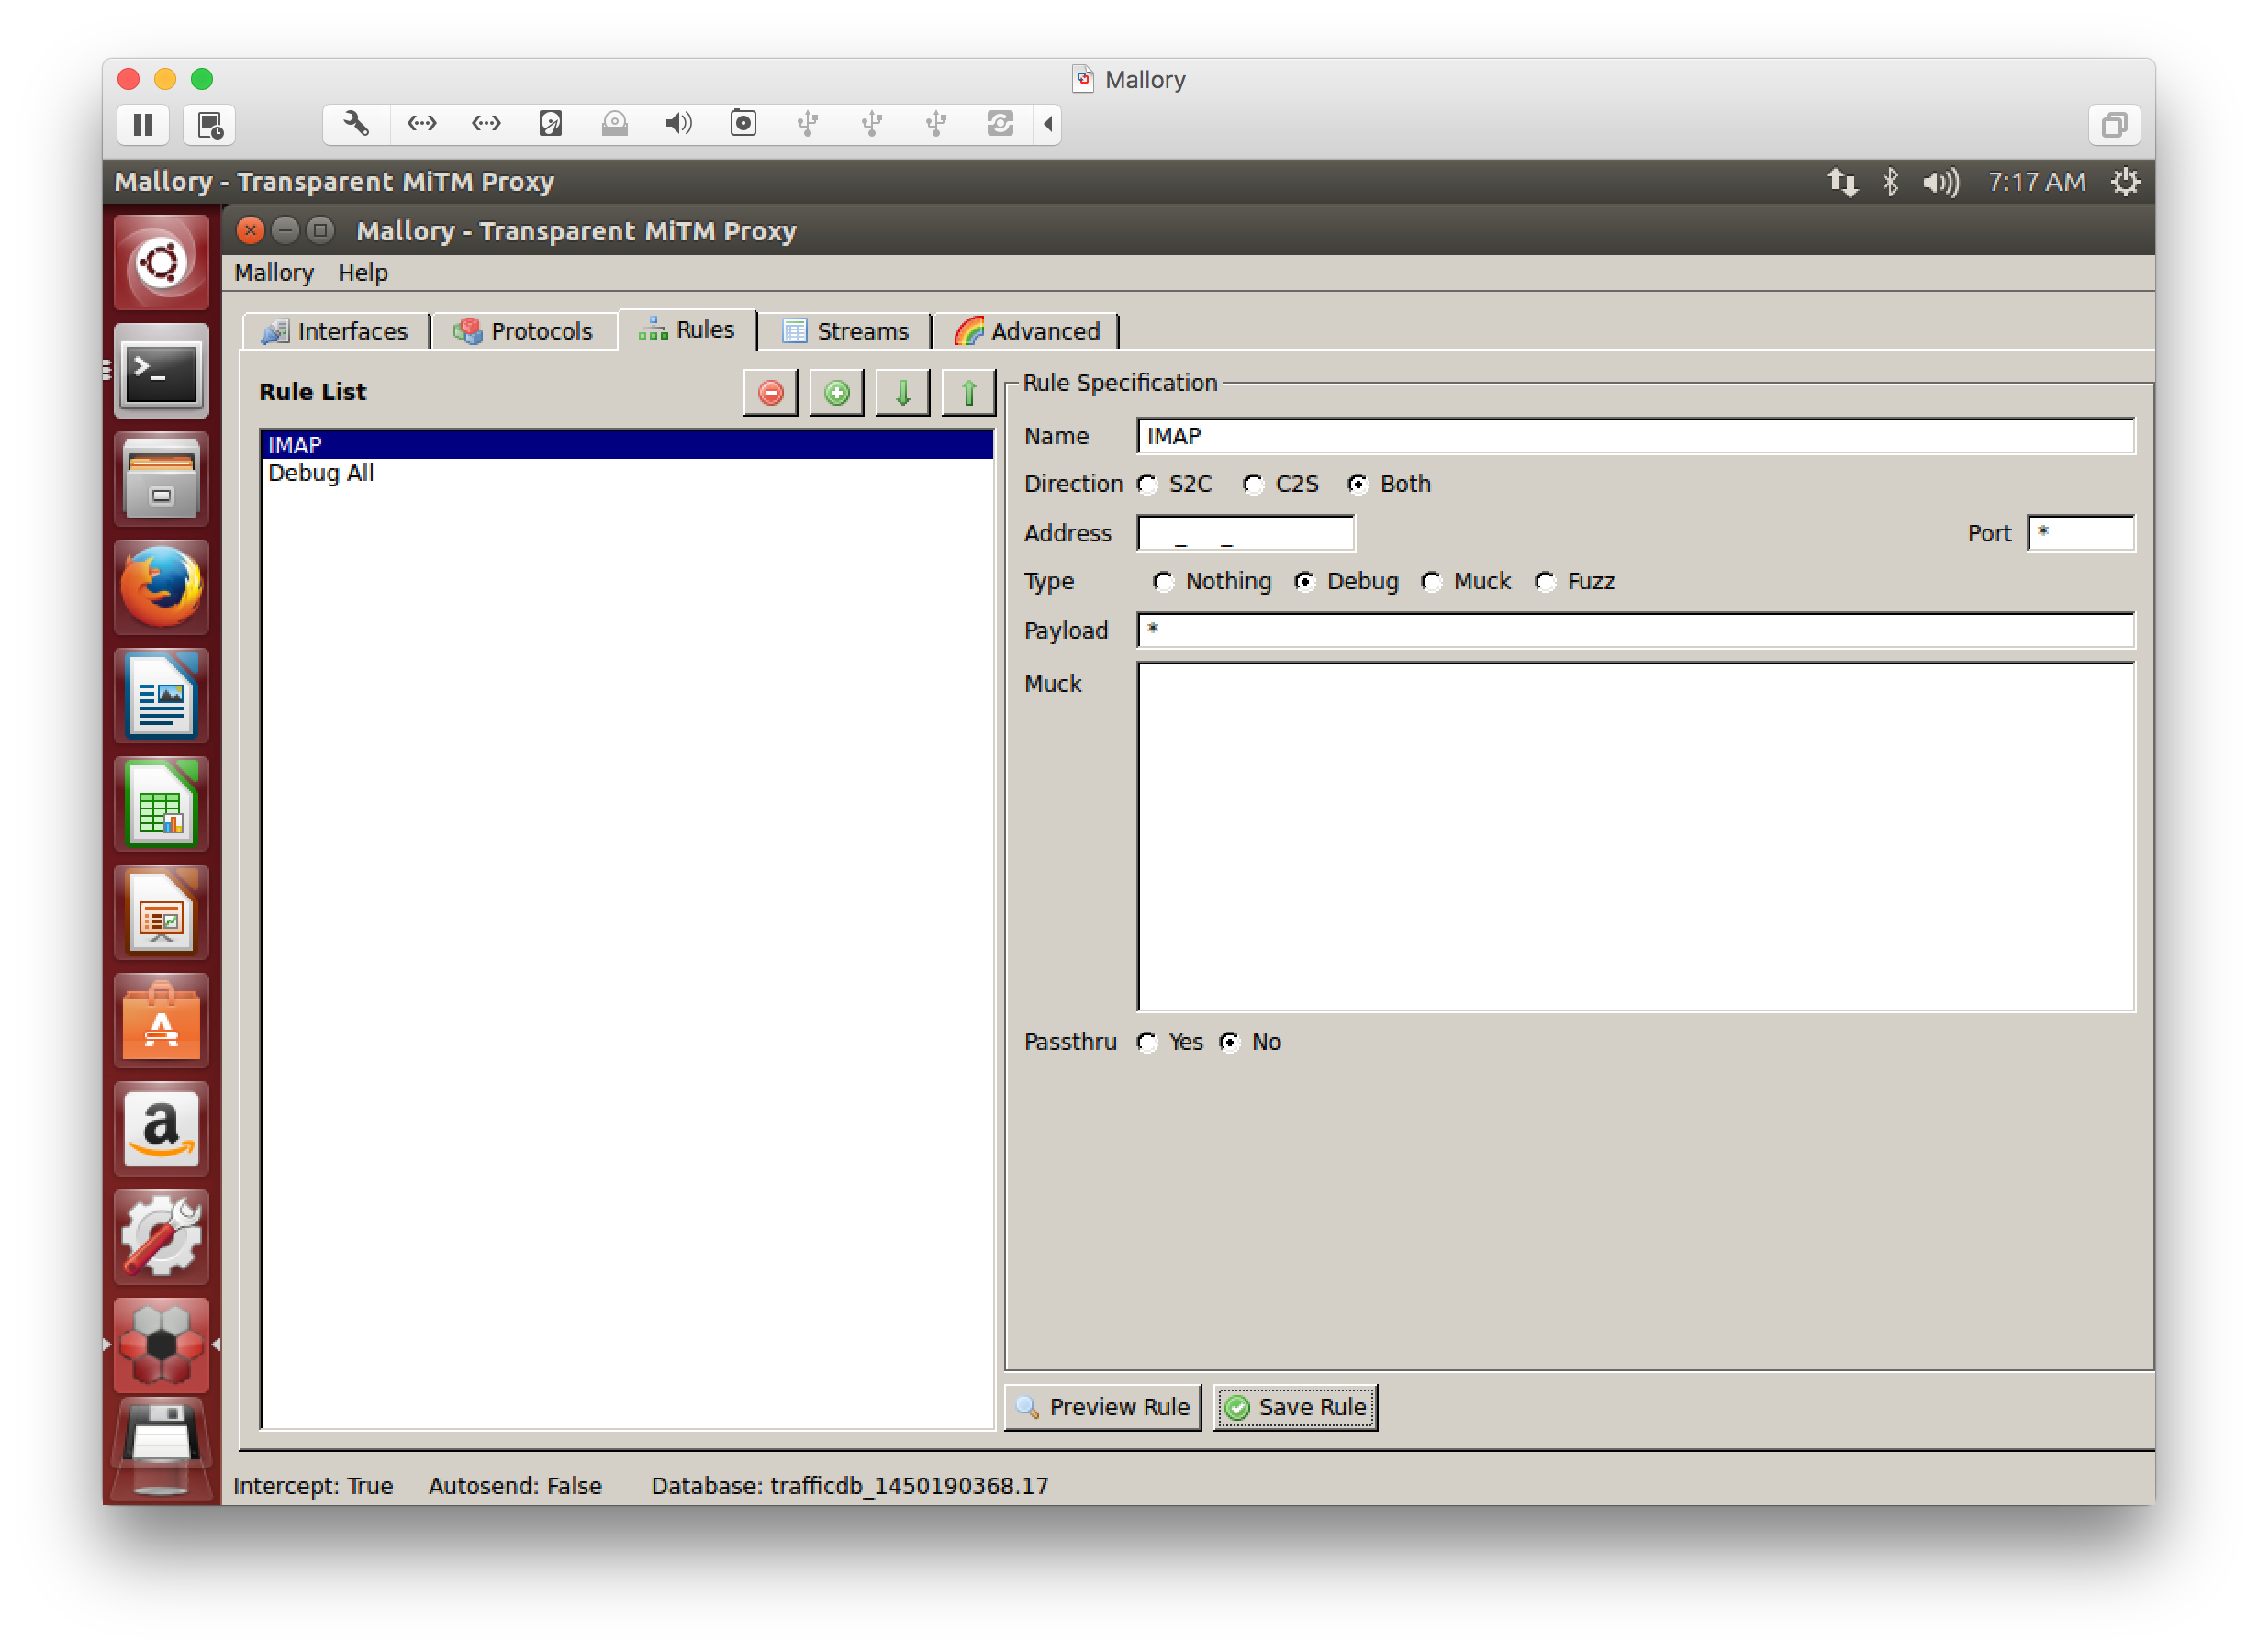
Mallory Rules
Mallory - Streams Tab
Here, “Intercept” should be enabled to have streams captured. Enabling “Auto Send” is similar to disabling Burpsuite Proxy’s intercept functionality. If everything is working correctly, you’ll see bi-directional traffic streams. Here’s an example of Mallory intercepting traffic between my messaging app and its IMAP/S server:
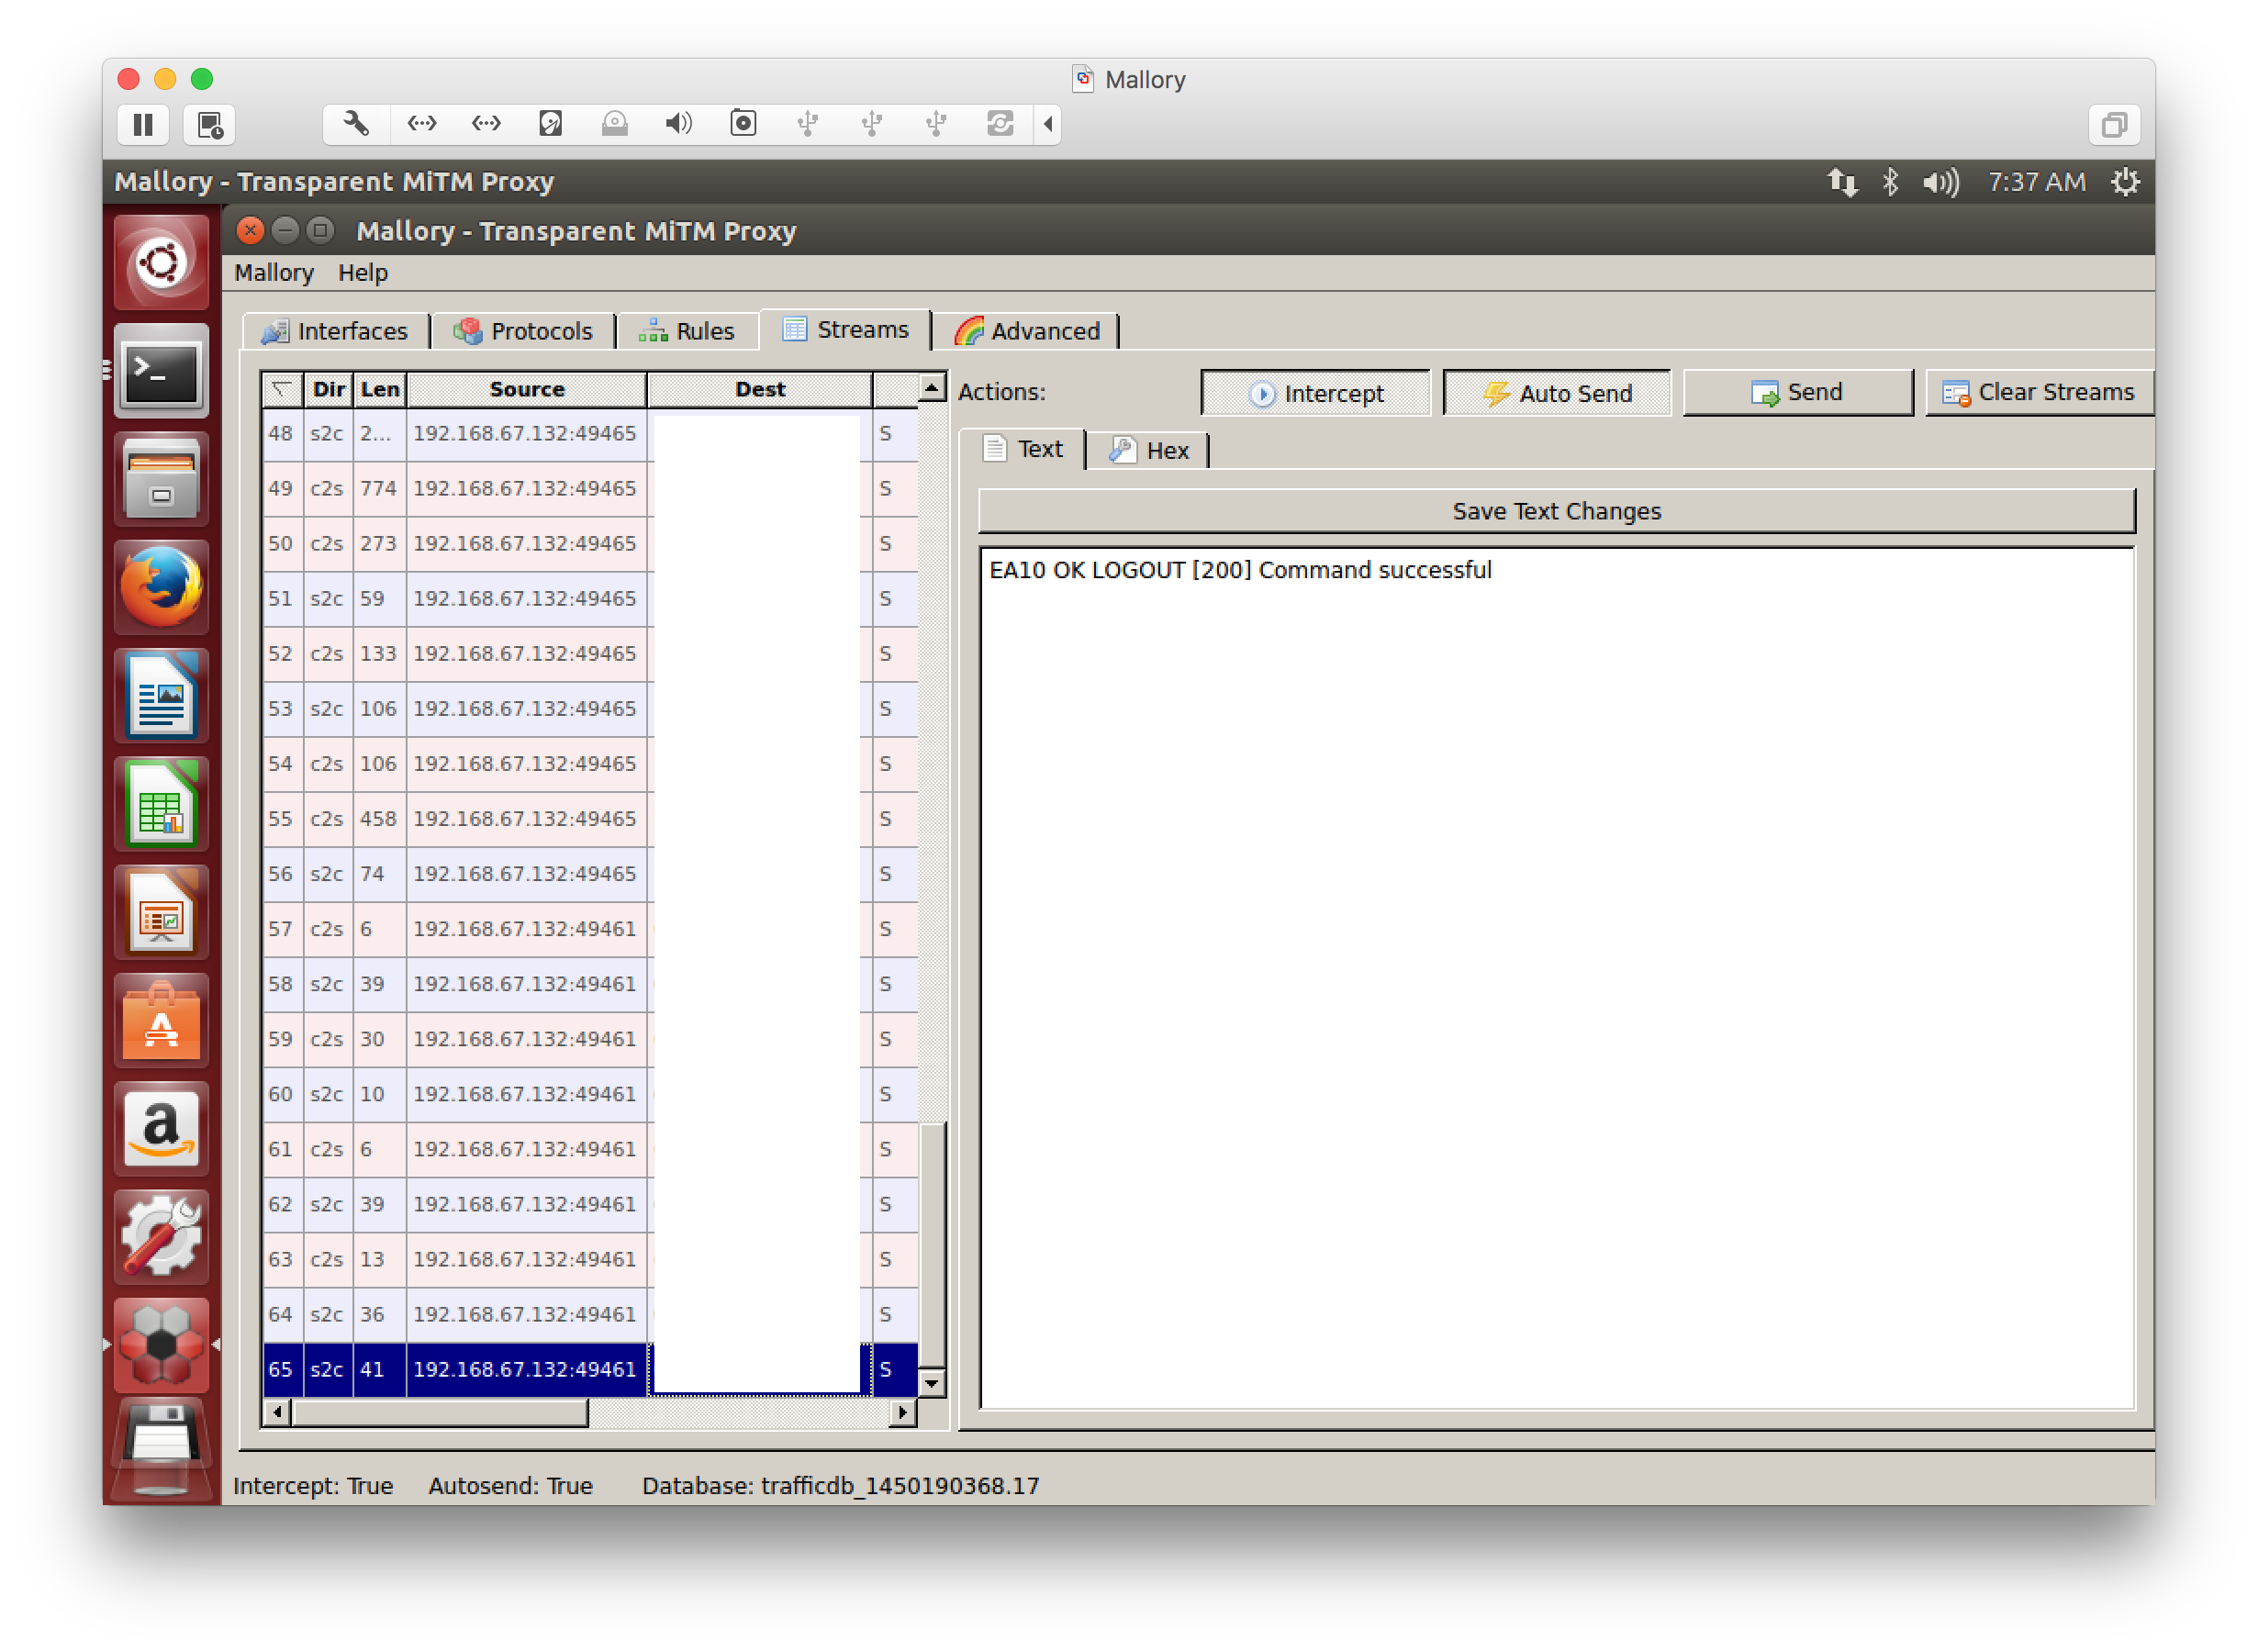
Mallory Streams tab
Startup Order
- Power on Mallory VM
- Open Terminal A and Terminal B
- In Terminal A:
$ sudo su -
# cd /root/mallory/current/src
# python mallory.py
- In Terminal B:
$ sudo su -
# cd /root/mallory/current/src
# python launchgui.py
- From Mallory GUI - Interfaces tab, set your VM’s bridged interface to “Outbound”, set the custom vmnet interface to “MitM” and click “Apply settings.”
- From Mallory GUI - Streams tab, select “Interrupt” and, optionally, “Auto-send”
- Power on Kali / Rogue AP VM
- Select the “Mallory” network interface in network-manager
- Connect TP-LINK device
- Run hostapd
- Connect Mobile messaging app to the hostapd AP
- Observe traffic proxied by Mallory in the Streams tab
Troubleshooting
Be sure that you’ve launched mallory.py and launchgui.py in your mallory vm! Sometimes, mallory.py will break “behind the scenes” and you need to inspect its terminal window.
Be sure your VM interfaces are set accordingly!
If your Kali / Rogue AP VM has trouble reaching the Internet after launching hostapd, open a terminal and type:
# route add default gw <mallory ip>
Resources
These resources were helpful during my endeavor to install and configure Mallory:
https://bitbucket.org/IntrepidusGroup/mallory/wiki/Installation
https://bitbucket.org/IntrepidusGroup/mallory/wiki/Virtual%20Machine%20Setup
https://groups.google.com/forum/#!topic/mallory-proxy/PF2MwXOpcEg
http://blog.opensecurityresearch.com/2012/05/mallory-mitm-fix-ssl-decryption.html